How to Configure an OpenVPN Server in Ubuntu 18.04?
Introduction
Do you want to access the Internet securely from your smartphone or laptop when connected to an unreliable network such as the Wi-Fi of a hotel or cafeteria? A Virtual Private Network (VPN) allows you to go through untrusted networks privately and securely as if you were on a private network. Traffic emerges from the VPN server and continues its journey to the destination.
When combined with HTTPS connections , this setting allows you to protect your logins and wireless transactions. You can avoid geographic restrictions and censorship, and protect your location and any unencrypted HTTP traffic from the untrusted network.
OpenVPN is an open source Secure Socket Layer (SSL) VPN solution that offers a wide range of configurations. In this tutorial, we will configure an OpenVPN server in a Droplet and then configure access to it from Windows, OS X, iOS and Android. This tutorial will keep the installation and configuration steps as simple as possible for these configurations.
Previous requirements
To complete this tutorial, you will need to have access to an Ubuntu 18.04 server.
You must configure a non-root user, with privileges
sudobefore starting this guide. You can follow our Initial Ubuntu 18.04 Server Configuration Guide to configure a user with the appropriate permissions. The linked tutorial will also configure a firewall , which we will assume is in place during this guide.
When you are ready to start, log in to your Ubuntu server as a user
sudoand continue below.Step 1 - Install OpenVPN
To start, we will install OpenVPN on our server. OpenVPN is available in the default Ubuntu repositories, so we can use it
aptfor installation. We will also install the package easy-rsa, which will help us configure an internal CA (certification authority) for use with our VPN.
To update the server package index and install the necessary packages, type:
- sudo apt-get update
- sudo apt-get install openvpn easy-rsa
The necessary software is now on the server, ready to be configured.
Step 2 - Configure the CA Directory
OpenVPN is a TLS / SSL VPN. This means that it uses certificates to encrypt the traffic between the server and the clients. To issue trusted certificates, we will have to configure our own simple certification authority (CA).
To start, we can copy the template
easy-rsadirectory into our personal directory with the command make-cadir:
- make-cadir ~/openvpn-ca
Move the newly created directory to start configuring the CA:
- cd ~/openvpn-ca
Step 3 - Configure AC Variables
To configure the values that our CA will use, we must edit the file
varswithin the directory. Open that file now in your text editor:
- nano vars
Inside, you will find some variables that can be adjusted to determine how your certificates will be created. We just have to worry about some of these.
Towards the bottom of the file, look for the setting that sets the default field values for the new certificates. It must be something like this:
~ / openvpn-ca / vars
. . .

export KEY_COUNTRY="US"
export KEY_PROVINCE="CA"
export KEY_CITY="SanFrancisco"
export KEY_ORG="Fort-Funston"
export KEY_EMAIL="me@myhost.mydomain"
export KEY_OU="MyOrganizationalUnit"

. . .
Edit the values in red to your preference, but do not leave them blank:
~ / openvpn-ca / vars
. . .

export KEY_COUNTRY="US"
export KEY_PROVINCE="NY"
export KEY_CITY="New York City"
export KEY_ORG="DigitalOcean"
export KEY_EMAIL="admin@example.com"
export KEY_OU="Community"

. . .
While we are here, we will also edit the value
KEY_NAMEjust below this section, which fills the subject field. To keep this simple, we'll call it serverin this guide:
~ / openvpn-ca / vars
export KEY_NAME="server"
When finished, save and close the file.
Step 4 - Build the Certificate of Authority
Now, we can use the variables we set and utilities
easy-rsato build our certification authority.
Make sure it is in the CA directory and then generate the file
varsyou just edited:
- cd ~/openvpn-ca
- source vars
You should see the following if it was generated correctly:
Output
NOTE: If you run ./clean-all, I will be doing a rm -rf on /home/sammy/openvpn-ca/keys
Make sure we operate in a clean environment by typing:
- ./clean-all
Now, we can build our root CA by writing:
- ./build-ca
This will start the process of creating the root certificate authority key and the certificate. Since we fill the file
vars, all values must be filled in automatically. Simply press Enter through the prompts to confirm the selections:
Output
Generating a 2048 bit RSA private key
..........................................................................................+++
...............................+++
writing new private key to 'ca.key'
-----
You are about to be asked to enter information that will be incorporated
into your certificate request.
What you are about to enter is what is called a Distinguished Name or a DN.
There are quite a few fields but you can leave some blank
For some fields there will be a default value,
If you enter '.', the field will be left blank.
-----
Country Name (2 letter code) [US]:
State or Province Name (full name) [NY]:
Locality Name (eg, city) [New York City]:
Organization Name (eg, company) [DigitalOcean]:
Organizational Unit Name (eg, section) [Community]:
Common Name (eg, your name or your server's hostname) [DigitalOcean CA]:
Name [server]:
Email Address [admin@email.com]:
Now we have a CA that can be used to create the rest of the files we need.
Step 5 - Create server certificates, keys and encrypted files
Next, we will generate our server certificate and key pair, as well as some additional files used during the encryption process.
Start by generating the OpenVPN server certificate and the key pair. We can do it by writing:
Note: If you choose a name other than that
server, you will have to adjust some of the following instructions. For example, when copying the generated files to the directory /etc/openvpn, you will have to replace the correct names. You will also have to subsequently modify the file /etc/openvpn/server.confto correctly point to the files .crtand .key.
- ./build-key-server server
Again, the ads will have default values based on the argument we just passed (
servidor) and the content of our file varsthat we have obtained.
You can accept the default values by pressing Enter . Do not enter a challenge password for this setting. In the end, you will have to enter and the two questions to sign and confirm the certificate:
Output
. . .

Certificate is to be certified until May  1 17:51:16 2026 GMT (3650 days)
Sign the certificate? [y/n]:y


1 out of 1 certificate requests certified, commit? [y/n]y
Write out database with 1 new entries
Data Base Updated
Next, we will generate some other elements. We can generate a strong Diffie-Hellman key to use during key exchange by typing:
- ./build-dh
This may take a few minutes to complete.
Subsequently, we can generate an HMAC signature to strengthen the TLS integrity verification capabilities of the server:
- openvpn --genkey --secret keys/ta.key
Step 6 - Generate a Client Certificate and a Pair of Keys
Next, we can generate a client certificate and a pair of keys. Although this can be done on the client machine and then signed by the server / CA, for security reasons, for this guide the key signed on the server will be generated for simplicity.
We will generate a unique client key / certificate for this guide, but if you have more than one client, you can repeat this process as many times as you wish. Passing a unique value to the script for each client.
As you can go back to this step later, we will recreate the file
vars. We will use client1as the value of our first certificate / pair of keys for this guide.
To generate credentials without a password, to help with automated connections, use the command
build-keyin this way:
- cd ~/openvpn-ca
- source vars
- ./build-key client1
If you want to create a password-protected set of credentials instead, use the command
build-key-pass:
- cd ~/openvpn-ca
- source vars
- ./build-key-pass client1
Again, the default values must be populated, so you can only press Enter to continue. Leave the challenge password blank and be sure to write and for requests that ask if you sign and confirm the certificate.
Step 7 - Configure the OpenVPN Service
Next, we can start configuring the OpenVPN service using the credentials and files that we have generated.
Copy the Files to the OpenVPN Directory
To begin, we need to copy the files we need to the configuration directory of
/etc/openvpn.
We can start with all the files we just generated. These were placed inside the directory
~/openvpn-ca/keysas they were created. We need to move our cert and CA key, our cert and server key, the HMAC signature, and the Diffie-Hellman file:
- cd ~/openvpn-ca/keys
- sudo cp ca.crt ca.key server.crt server.key ta.key dh2048.pem /etc/openvpn
Next, we need to copy and unzip a sample OpenVPN configuration file into the configuration directory so that we can use it as the basis for our configuration:
- gunzip -c /usr/share/doc/openvpn/examples/sample-config-files/server.conf.gz | sudo tee /etc/openvpn/server.conf
Adjust OpenVPN Settings
Now that our files are in place, we can modify the server configuration file:
- sudo nano /etc/openvpn/server.conf
Basic Configuration
First, find the HMAC section looking for the directive
tls-auth. Delete the ";" To uncomment the line tls-auth. Below this, add the parameter by key-directionsetting it to "0":
/etc/openvpn/server.conf
tls-auth ta.key 0 # This file is secret
key-direction 0
Next, find the section on cryptographic encryption by looking for the commented lines of
cipher. Encryption AES-128-CBCoffers a good level of encryption and is well supported. Delete the ";" To uncomment the line cipher AES-128-CBC:
/etc/openvpn/server.conf
cipher AES-128-CBC
Below this, add a line
authto select the HMAC message summary algorithm. For this, it SHA256is a good option:
/etc/openvpn/server.conf
auth SHA256
Finally, look for the configuration of
usery groupand remove the ";" At the beginning of the line to uncomment:user nobody
group nogroup
(Optional) Upload DNS Changes to Redirect All Traffic Through the VPN
The above configuration will create the VPN connection between the two machines, but will not force any connection to use the tunnel. If you want to use the VPN to route all your traffic, you probably want to upload the DNS settings to the client computers.
You can do this by uncommenting some directives that will configure client machines to redirect all web traffic through the VPN. Find the section of
redirect-gatewayand remove the semicolon ";" From the beginning of the line redirect-gatewayto uncomment it:
/etc/openvpn/server.conf
push "redirect-gateway def1 bypass-dhcp"
Just below this, find the section
dhcp-option. Again, remove the ";" From in front of both lines to uncomment them:
/etc/openvpn/server.conf
push "dhcp-option DNS 208.67.222.222"
push "dhcp-option DNS 208.67.220.220"
This should help clients reconfigure their DNS settings to use the VPN tunnel as the default gateway.
(Optional) Set the port and protocol
By default, the OpenVPN server uses port 1194 and the UDP protocol to accept client connections. If you need to use a different port due to restrictive network environments where your clients may be, you can change the port option
port. If you are not hosting web content on your OpenVPN server, port 443 is a popular option as it is normally allowed through firewall rules.
/etc/openvpn/server.conf
# Optional!
port 443
Often, the protocol can restrict that port as well. If so, change
protofrom UDP to TCP:
/etc/openvpn/server.conf
# Optional!
proto tcp
If you do not need to use a different port, it is better to leave these two settings as their default value.
(Optional) Report Credentials Not Default
If you chose a different name during the previous command
./build-key-server, modify the lines certand keyyou see the files to target .crtand .keyappropriate. If you used the default server, it should already be configured correctly:
/etc/openvpn/server.conf
cert server.crt
key server.key
When finished, save and close the file.
Step 8 - Adjust the Server Network Configuration
Next, we need to adjust some aspects of the server network so that OpenVPN can route traffic correctly.
Allow IP forwarding
First, we need to allow the server to redirect traffic. This is quite essential for the functionality we want our VPN server to provide.
We can adjust this setting by modifying the file
/etc/sysctl.conf
- sudo nano /etc/sysctl.conf
In the file, find the line you set
net.ipv4.ip_forward. Remove the " # " character from the beginning of the line to uncomment that configuration:
/etc/sysctl.conf
net.ipv4.ip_forward=1
Save and close the file when finished.
To read the file and adjust the values of the current session, type:
- sudo sysctl -p
Adjust UFW Rules to Masquerade Customer Connections
If you followed the initial setup guide of the Ubuntu 18.04 server in the prerequisites, you should have the UFW firewall installed. Regardless of whether you use the firewall to block unwanted traffic (which you should almost always do), we need the firewall in this guide to manipulate some of the traffic that enters the server. We need to modify the rules file to configure masking, a concept
iptablesthat provides dynamic NAT instantly to correctly route client connections.
Before opening the firewall configuration file to add masking, we need to find the public network interface of our machine. To do this, write:
- ip route | grep default
Your public interface must follow the word "dev". For example, this result shows the interface named wlp11s0, which is highlighted below:
Output
default via 203.0.113.1 dev wlp11s0 proto static metric 600
When you have the interface associated with your default path, open the file
/etc/ufw/before.rulesto add the relevant settings:
- sudo nano /etc/ufw/before.rules
This file controls the settings that must be put in place, before the conventional UFW rules are loaded. Towards the top of the file, add the highlighted lines below. This will set the default directive for the chain
POSTROUTINGin the table natand mask any traffic coming from the VPN:
Note: Remember to replace
eth0on the line -A POSTROUTINGwith the interface you found in the previous command.
/etc/ufw/before.rules
#
# rules.before
#
# Rules that should be run before the ufw command line added rules. Custom
# rules should be added to one of these chains:
# ufw-before-input
# ufw-before-output
# ufw-before-forward
#
# START OPENVPN RULES
# NAT table rules
*nat
:POSTROUTING ACCEPT [0:0]
# Allow traffic from OpenVPN client to eth0
-A POSTROUTING -s 10.8.0.0/8 -o eth0 -j MASQUERADE
COMMIT
# END OPENVPN RULES
# Don't delete these required lines, otherwise there will be errors
*filter
. . .
Save and close the file, when finished.
We have to tell UFW to also allow packages sent by default. To do this, we will open the file
/etc/default/ufw:
- sudo nano /etc/default/ufw
In the file, look for the directive
DEFAULT_FORWARD_POLICY. We will change the value of DROPto ACCEPT:
/etc/ufw/before.rules
DEFAULT_FORWARD_POLICY="ACCEPT"
Save and close the file when finished.
Open the OpenVPN Port and Enable Changes
Next, we will adjust the firewall to allow traffic to OpenVPN.
If you did not change the port and the protocol in the file
/etc/openvpn/server.conf, you must open UDP traffic to port 1194. If you have modified the port and / or the protocol, replace the values you selected here.
We will also add the SSH port in case you forgot to add it by following the prerequisites tutorial:
- sudo ufw allow 1194/udp
- sudo ufw allow OpenSSH
Now, we can disable and re-enable UFW to load changes to all the files we have modified:
- sudo ufw disable
- sudo ufw enable
Our server is configured to correctly handle OpenVPN traffic.
Step 9 - Start and Enable the OpenVPN Service
Finally we are ready to start the OpenVPN service on our server. We can do this using systemd.
We need to start the OpenVPN server by specifying the name of our configuration file as an instance variable, after the file name of the systemd unit. Our configuration file for our server is called , so we will add at the end of our drive file when we call it:
/etc/openvpn/server.conf@server
- sudo systemctl start openvpn@server
Verify that the service was started correctly by typing:
- sudo systemctl status openvpn@server
If everything went well, your output should be similar to this:
Output
● openvpn@server.service - OpenVPN connection to server
Loaded: loaded (/lib/systemd/system/openvpn@.service; disabled; vendor preset: enabled)
Active: active (running) since Tue 2016-05-03 15:30:05 EDT; 47s ago
Docs: man:openvpn(8)
https://community.openvpn.net/openvpn/wiki/Openvpn23ManPage
https://community.openvpn.net/openvpn/wiki/HOWTO
Process: 5852 ExecStart=/usr/sbin/openvpn --daemon ovpn-%i --status /run/openvpn/%i.status 10 --cd /etc/openvpn --script-security 2 --config /etc/openvpn/%i.conf --writepid /run/openvpn/%i.pid (code=exited, sta
Main PID: 5856 (openvpn)
Tasks: 1 (limit: 512)
CGroup: /system.slice/system-openvpn.slice/openvpn@server.service
└─5856 /usr/sbin/openvpn --daemon ovpn-server --status /run/openvpn/server.status 10 --cd /etc/openvpn --script-security 2 --config /etc/openvpn/server.conf --writepid /run/openvpn/server.pid
May 03 15:30:05 openvpn2 ovpn-server[5856]: /sbin/ip addr add dev tun0 local 10.8.0.1 peer 10.8.0.2
May 03 15:30:05 openvpn2 ovpn-server[5856]: /sbin/ip route add 10.8.0.0/24 via 10.8.0.2
May 03 15:30:05 openvpn2 ovpn-server[5856]: GID set to nogroup
May 03 15:30:05 openvpn2 ovpn-server[5856]: UID set to nobody
May 03 15:30:05 openvpn2 ovpn-server[5856]: UDPv4 link local (bound): [undef]
May 03 15:30:05 openvpn2 ovpn-server[5856]: UDPv4 link remote: [undef]
May 03 15:30:05 openvpn2 ovpn-server[5856]: MULTI: multi_init called, r=256 v=256
May 03 15:30:05 openvpn2 ovpn-server[5856]: IFCONFIG POOL: base=10.8.0.4 size=62, ipv6=0
May 03 15:30:05 openvpn2 ovpn-server[5856]: IFCONFIG POOL LIST
May 03 15:30:05 openvpn2 ovpn-server[5856]: Initialization Sequence Completed
You can also verify that the OpenVPN interface
tun0is available by typing:
- ip addr show tun0
You should see a configured interface:
Output
4: tun0: <POINTOPOINT,MULTICAST,NOARP,UP,LOWER_UP> mtu 1500 qdisc noqueue state UNKNOWN group default qlen 100
link/none
inet 10.8.0.1 peer 10.8.0.2/32 scope global tun0
valid_lft forever preferred_lft foreve
If all went well, enable the service to start automatically at startup:
- sudo systemctl enable openvpn@server
Step 10 - Create Client Configuration Infrastructure
Next, we need to configure a system that allows us to easily create client configuration files.
Creation of the Client Configuration Directory Structure
Create a directory structure in your personal directory to store the files:
- mkdir -p ~/client-configs/files
Since our client configuration files will have the client keys embedded, we must block the permissions in our internal directory:
- chmod 700 ~/client-configs/files
Creating a Base Configuration
Next, we are going to copy an example of client configuration to our directory to use it as our base configuration:
- cp /usr/share/doc/openvpn/examples/sample-config-files/client.conf ~/client-configs/base.conf
Open this new file in your text editor:
- nano ~/client-configs/base.conf
Within the file, we need to make some adjustments.
First, look for the directive
remote. This points the client to our OpenVPN server address. This must be the public IP address of your OpenVPN server. If you have changed the port on which the OpenVPN server is listening, change 1194 to the port you selected:
~ / client-configs / base.conf
. . .
# The hostname/IP and port of the server.
# You can have multiple remote entries
# to load balance between the servers.
remote server_IP_address 1194
. . .
Make sure the protocol matches the value you are using in the server configuration:
~ / client-configs / base.conf
proto udp
Then, remove the comment from the directives of
userand groupremoving the ";":
~ / client-configs / base.conf
# Downgrade privileges after initialization (non-Windows only)
user nobody
group nogroup
Find the directives they set
ca, certand key. Comment on these directives as we will add the certs and keys within the file itself:
~ / client-configs / base.conf
# SSL/TLS parms.
# See the server config file for more
# description.  It's best to use
# a separate .crt/.key file pair
# for each client.  A single ca
# file can be used for all clients.
#ca ca.crt
#cert client.crt
#key client.key
Reflect the configuration of
cipherand auththat we set in the file /etc/openvpn/server.conf:
~ / client-configs / base.conf
cipher AES-128-CBC
auth SHA256
Then add the directive
key-directionsomewhere in the file. This must be set to " 1 " to work with the server:
~ / client-configs / base.conf
key-direction 1
Finally, add some commented lines . We want to include them with each configuration, but we must only enable them for Linux clients that are sent with a file
/etc/openvpn/update-resolv-conf. This script uses the utility resolvconfto update DNS information for Linux clients.
~ / client-configs / base.conf
# script-security 2
# up /etc/openvpn/update-resolv-conf
# down /etc/openvpn/update-resolv-conf
If your client is running Linux and has a file
/etc/openvpn/update-resolv-conf, you must uncomment these lines from the generated OpenVPN client configuration file.
Save the file when finished.
Creating a Configuration Generator Script
Next, we will create a simple script to compile our base configuration with the relevant certificate files, keys and encryption. This will place the generated configuration in the directory
~/client-configs/files.
Create and open a file called
make_config.shinside the directory ~/client-configs:
- nano ~/client-configs/make_config.sh
Inside the file, paste the following script:
~ / client-configs / make_config.sh
#!/bin/bash

# First argument: Client identifier

KEY_DIR=~/openvpn-ca/keys
OUTPUT_DIR=~/client-configs/files
BASE_CONFIG=~/client-configs/base.conf

cat ${BASE_CONFIG} \
    <(echo -e '<ca>') \
    ${KEY_DIR}/ca.crt \
    <(echo -e '</ca>\n<cert>') \
    ${KEY_DIR}/${1}.crt \
    <(echo -e '</cert>\n<key>') \
    ${KEY_DIR}/${1}.key \
    <(echo -e '</key>\n<tls-auth>') \
    ${KEY_DIR}/ta.key \
    <(echo -e '</tls-auth>') \
    > ${OUTPUT_DIR}/${1}.ovpn
When finished, save and close the file.
Mark the file as executable, by typing:
- chmod 700 ~/client-configs/make_config.sh
Step 11 - Generate Client Settings
Now, we can easily generate client configuration files.
If you continued with the guide, you created a client certificate and a key named
client1.crtand client1.keyrespectively executing the command in step 6. We can generate a configuration for these credentials by moving to our directory and using the script we have done:./build-keyclient1~/client-configs
- cd ~/client-configs
- ./make_config.sh client1
If all went well, we should have a file
client1.ovpnin our directory ~/client-configs/files:
- ls ~/client-configs/files
Output
client1.ovpn
Configuration Transfer to Client Devices
We need to transfer the client configuration file to the corresponding device. For example, this could be your local computer or a mobile device.
While the exact applications used to perform this transfer will depend on your choice and the operating system of the device, if you want the application to use SFTP (SSH file transfer protocol) or SCP (Secure Copy) on the server. This will transport your client's VPN authentication files through an encrypted connection.
Here is an example SFTP command using our client1.ovpn example . This command can be executed from your local computer (OS X or Linux). Place the file
.ovpnin your personal directory:
- sftp sammy@openvpn_server_ip:client-configs/files/client1.ovpn ~/
Here are several tools and tutorials to transfer files securely from the server to a local computer:
- WinSCP
- How to Use SFTP to Transfer Files Safely with a Remote Server
- How to Use Filezilla to Transfer and Manage Files Safely in your VPS
Step 12 - Install Client Configuration
Now, let's discuss how to install a client VPN profile on Windows, OS X, iOS and Android. None of these customer instructions depend on each other, so feel free to jump to what is applicable to your need.
The OpenVPN connection will call the file
.ovpnin any way you named it. In our example, this means that the connection will be called client1.ovpnfor the first client file we generate.Windows
Installation
The OpenVPN client application for Windows can be found on the OpenVPN Downloads page . Choose the appropriate installation version for your version of Windows.
Note: OpenVPN needs administrative privileges to install.
After installing OpenVPN, copy the file
.ovpnto:C:\Program Files\OpenVPN\config
When you start OpenVPN, you will automatically see the profile and make it available.
OpenVPN must be run as an administrator every time it is used, even for administrative accounts. To do this without having to right-click and select Run as administrator each time you use the VPN, you can predefine this, but this must be done from an administrative account. This also means that standard users will need to enter the administrator password to use OpenVPN. On the other hand, standard users cannot connect to the server correctly unless the OpenVPN application on the client has administrator rights, so elevated privileges are necessary.
To configure the OpenVPN application to always run as an administrator, right-click on its shortcut icon and go to Properties . At the bottom of Compatibility , click the Change settings button for all users . In the new window, select Run this program as administrator .
Connecting
Each time you start the OpenVPN graphical interface, Windows will ask if you want to allow the program to make changes to your computer. Click Yes . The launch of the OpenVPN client application only places the applet in the system tray so that the VPN can connect and disconnect as necessary; It doesn't really make the VPN connection.
Once OpenVPN is started, start a connection by entering the system tray subprogram and right-clicking on the OpenVPN applet icon. This opens the context menu. Select client1 at the top of the menu (which is our profile
client1.ovpn) and choose Connect .
A status window will open showing the log output while the connection is established and a message will be displayed once the client is connected.
Disconnect the VPN in the same way: Go to the applet in the system tray, right-click on the OpenVPN applet icon, select the client profile and click Disconnect .
OS X
Installation
Tunnelblick is a free open source OpenVPN client for Mac OS X. You can download the latest disk image from the Tunnelblick Downloads page . Double-click the
.dmgdownload file and follow the instructions to install.
Towards the end of the installation process, Tunnelblick will ask if you have any configuration files. It may be easier to answer No and let Tunnelblick finish. Open a Finder window and double click
client1.ovpn. Tunnelblick will install the client profile. Administrative privileges are required.
Connecting
Start Tunnelblick by double clicking on Tunnelblick in the Applications folder . Once Tunnelblick has been launched, there will be a Tunnelblick icon in the menu bar at the top right of the screen to control connections. Click on the icon and then on the Connect menu item to start the VPN connection. Select the client1 connection .
Linux
Installation
If you are using Linux, there are a variety of tools that you can use depending on your distribution. The desktop environment or the window manager can also include connection utilities.
However, the most universal way to connect is to use OpenVPN software.
On Ubuntu or Debian, you can install it just as you did on the server by typing:
- sudo apt-get update
- sudo apt-get install openvpn
In CentOS you can enable EPEL repositories and then install it by typing:
- sudo yum install epel-release
- sudo yum install openvpn
Setting
Check if your distribution includes the script
/etc/openvpn/update-resolv-conf:
- ls /etc/openvpn
Output
update-resolve-conf
Next, edit the configuration file of the OpenVPN client that you transferred:
- nano client1.ovpn
Uncomment the three lines we placed to adjust the DNS settings if we could find a file
update-resolv-conf:
client1.ovpn
script-security 2
up /etc/openvpn/update-resolv-conf
down /etc/openvpn/update-resolv-conf
If you are using CentOS, change
grupoof nogroupa nobodyto match the distribution groups available:
client1.ovpn
group nobody
Save and close the file.
Now, you can connect to the VPN by simply pointing the command
openvpnto the client configuration file:
- sudo openvpn --config client1.ovpn
This should connect it to your server.
IOS
Installation
From the iTunes App Store, locate and install OpenVPN Connect , the official iOS OpenVPN application. To transfer your iOS client configuration to the device, connect it directly to a computer.
Completing the transfer with iTunes will be described here. Open iTunes on the computer and click on iPhone > apps . Scroll down to the bottom of the Share files section and click on the OpenVPN application. The blank window on the right, OpenVPN Documents , is for file sharing. Drag the file
.ovpnto the OpenVPN Documents window.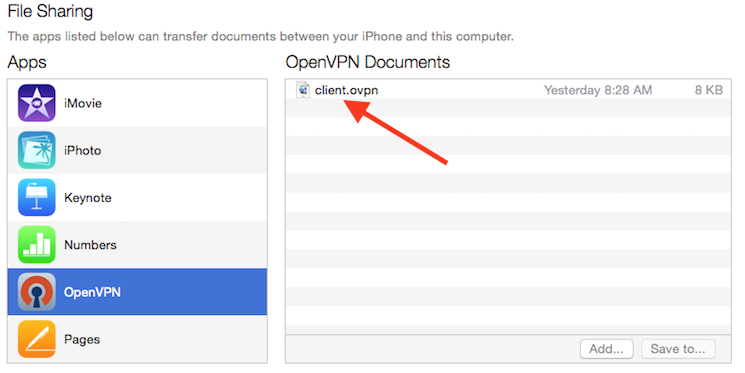
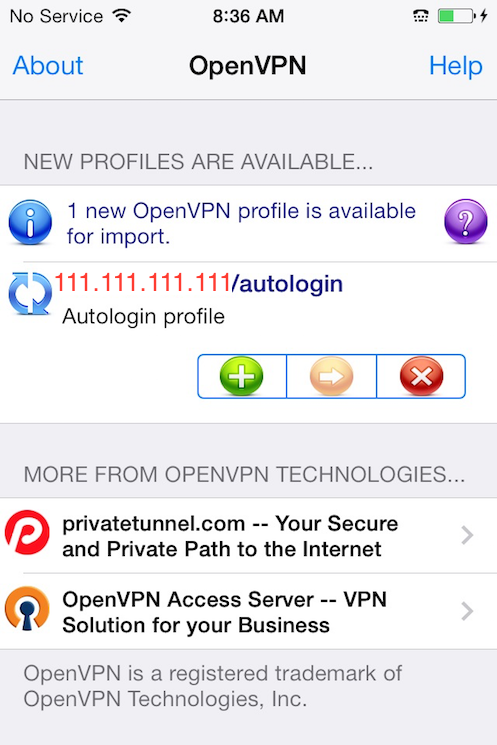
Now start the OpenVPN application on the iPhone. There will be a notification that a new profile is ready to import. Touch the green plus sign to import it.
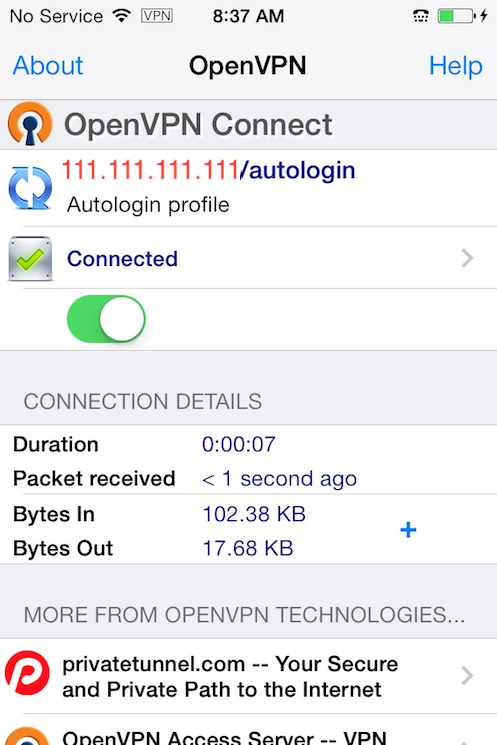
Connecting
OpenVPN is now ready to use with the new profile. Start the connection by sliding the Connectbutton to the On position . Disconnect by sliding the same button to Off .
Note: The VPN switch in Configuration cannot be used to connect to the VPN. If you try, you will receive a notice to connect only with the OpenVPN application.
Android
Installation
Open Google Play Store Find and install Android OpenVPN Connect , the official client-side application of Android OpenVPN.
The profile
.ovpncan be transferred by connecting the Android device to your computer via USB and copying the file. Alternatively, if you have an SD card reader, you can remove the SD card from the device, copy the profile on it and insert it into the Android device.
Start the OpenVPN application and touch the menu to import the profile.
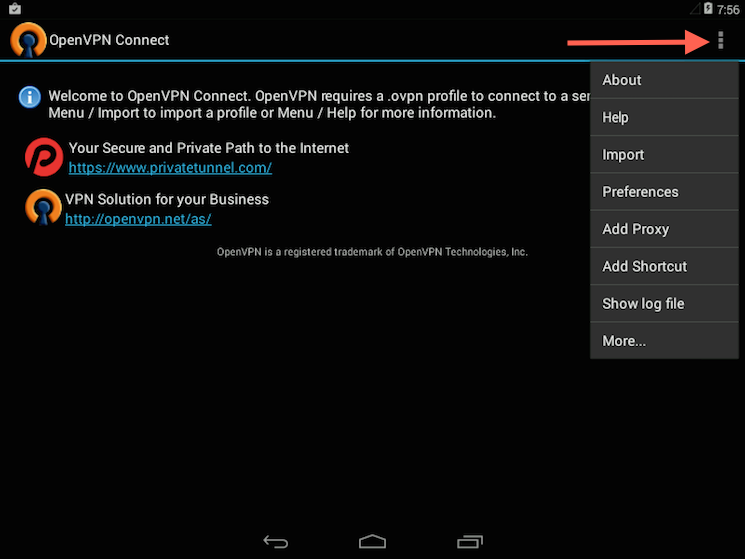
Next, navigate to the location of the saved profile (the screenshot uses
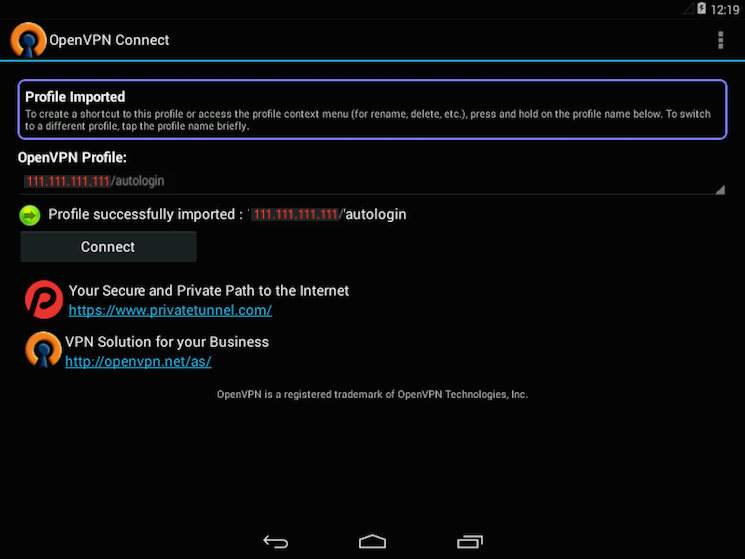
/sdcard/Download/) and select the file. The application will make a note that the profile has been imported.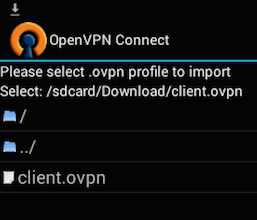
Connecting
To connect, simply press the Connect button . You will be asked if you trust the OpenVPN application. Select Accept * to start the connection. To disconnect from the VPN, return to the OpenVPN application and select Disconnect .
Step 13 - Test your VPN Connection
Once everything is installed, a simple check confirms that everything works correctly. Without having a VPN connection enabled, open a browser and go to DNSLeakTest .
The site will return the IP address assigned by your Internet service provider and when it appears to the rest of the world. To check your DNS settings through the same website, click Extended Test and it will tell you which DNS servers you are using.
Now connect the OpenVPN client to your Droplet VPN and refresh the browser. The completely different IP address of your VPN server should now appear. That is now how you look to the world. Once again, Extended Test of DNSLeakTest will verify your DNS settings and confirm that you are using DNS resolvers pushed by your VPN.
Step 14 - Revocation of Client Certificates
From time to time, you may have to revoke a client certificate to prevent additional access to the OpenVPN server.
To do this, enter your CA directory and rebuild the file
vars:
- cd ~/openvpn-ca
- source vars
Then call the command
revoke-fullusing the name of the client you want to revoke:
- ./revoke-full client3
This will show some output, ending in
error 23. This is normal and the process should have successfully generated the necessary revocation information, which is stored in a file called crl.pemwithin the subdirectory keys.
Transfer this file to the configuration directory
/etc/openvpn:
- sudo cp ~/openvpn-ca/keys/crl.pem /etc/openvpn
Then open the OpenVPN server configuration file:
- sudo nano /etc/openvpn/server.conf
At the bottom of the file, add the option
crl-verifyfor the OpenVPN server to check the certificate revocation list that we created each time a connection attempt is made:
/etc/openvpn/server.conf
crl-verify crl.pem
Save and close the file.
Finally, restart OpenVPN to implement certificate revocation:
- sudo systemctl restart openvpn@server
The client should now be able to successfully connect to the server using the old credential.
To revoke additional customers, follow this process:
- Generate a new certificate revocation list by searching the file
varsin the directory~/openvpn-caand then calling the scriptrevoke-fullin the client's name. - Copy the new certificate revocation list to the directory
/etc/openvpnto overwrite the old list. - Restart the OpenVPN service.
This process can be used to revoke any certificate you have previously issued for your server.
conclusion
Congratulations! You are now going through the Internet safely protecting your identity, location and traffic from snoopers and censors.
To configure more clients, just follow steps 6 and 11-13 for each additional device. To revoke access to customers, follow step 14 .