➥ How to create a PPTP VPN with MikroTik and RouterOS
Connecting your office (or home) equipment from the Internet is extremely simple thanks to Mikrotik and RouterOS . Many times we need to connect to a server within our Local Network but it turns out that we are out of the office, on a business trip and cannot access. VPNs precisely allow this and I will explain the simplest method to configure and understand how VPNs work .
If you want to learn how to do it, keep reading this tutorial ...
WHAT IS A VPN?
A virtual private network , in English: Virtual Private Network (VPN) is a computer network technology that allows a secure extension of the local area network (LAN) over a public or uncontrolled network such as the Internet. It allows the computer on the network to send and receive data on shared or public networks as if it were a private network with all the functionality, security and management policies of a private network.This is done by establishing a virtual point-to-point connection through the use of dedicated connections, encryption or the combination of both methods.
Common examplesthey are the possibility of connecting two or more branches of a company using as an Internet link, allowing members of the technical support team to connect from their home to the computer center, or for a user to access their home equipment from a remote site , such as a hotel. All this using the Internet infrastructure .
The VPN connection over the Internet is technically a wide area network (WAN) junction between the sites but the user looks like it is a private link - hence the designation "virtual private network".
And PPTP?
PPTP (Point to Point Tunneling Protocol), is an obsolete communications protocol that allows the implementation of virtual private networks or VPNs . A VPN is a private network of computers that uses the Internet to connect their nodes.
1.- REQUIREMENTS
The requirements to follow this tutorial are the following:
- 1 device with RouterOS (It can be a Mikrotik / RouterBoard router or an x86).
- Internet connection
- A computer outside the network (on the Internet) and another one within the LAN Local Network (in case we want to test)
2.- NETWORK SCHEME
In this example we are going to simulate a normal office with 1,2,3 ... N computers within the local network (LAN), a Mikrotik router and an external device that will be the remote computer that accesses from anywhere in the world to the LAN through the PPTP VPN tunnel .
The address to use will be as follows:
- Remote equipment: IP (Automatically assigned by PPTP VPN) and another Internet IP (no matter what)
- Mikrotik Router: WAN (192.168.80.1/24) LAN (10.1.101.1/24)
- LAN equipment: (10.1.101.0/24)
In the following image you can see a small scheme of how the sample network will be:
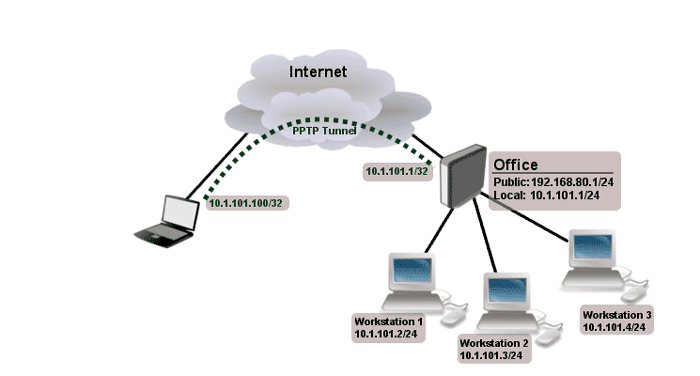 Brief network diagram
3.- PPTP VPN TUNNEL CONFIGURATION
If you are reading this "advanced" tutorial, I assume that you know how to configure the IPs of the network interfaces of a Mikrotik router, as well as basic concepts of Networking:
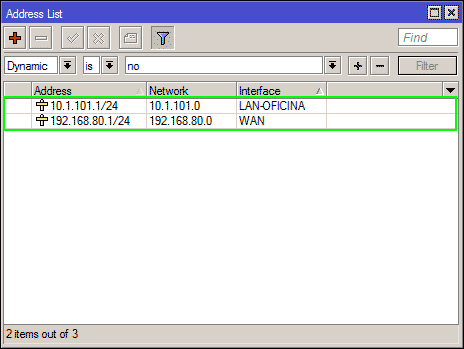 Mikrotik IP addresses
The two network interfaces that the Mikrotik router will have are WAN and LAN-INTERNET:
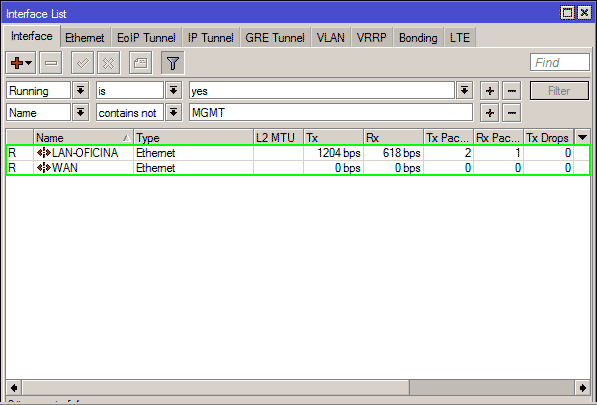 Network interfaces
The next step will be to create an Address Pool from the IP-> IP Pool main menu to assign to VPN clients. This Address Pool must be on the same network as the 10.1.101.0/24 LAN equipment. We will assign a range of IPS from 10.1.101.200-10.1.101.250 , so we will have a total of 50 IPs available to assign to VPN users:
 VPN address pool
Now we will create a new Profile for our VPN connection, for this from the main menu -> PPP in the Profile tab, we will add a new profile. In the General tab we will enter a name : VPN-PROFILE, in local address we will put the LAN IP of the Mikrotik router 10.1.101.1 and in remote address we will select the Pool created in the previous step. If we want to assign DNS servers , we will put the ones we need. In this example, the Google 2 will be used to see if the DNS is effectively configured on the client computer:
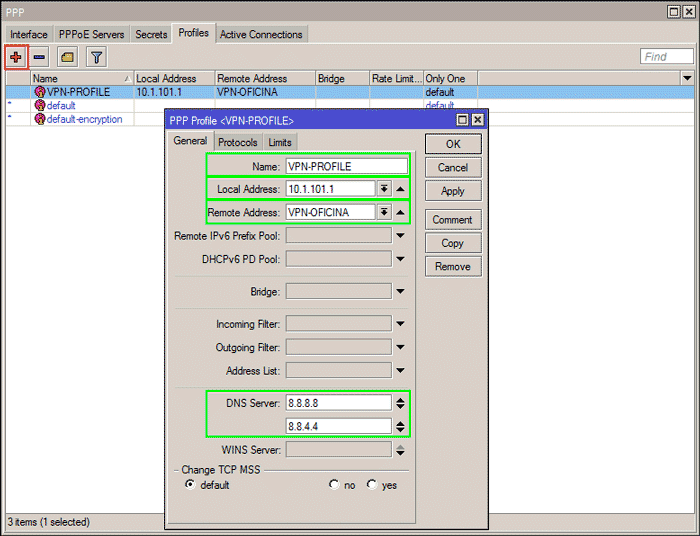 General VPN Office Profile
In the Protocols tab we will leave everything as it is, but we must mark Use Encryption to "yes":
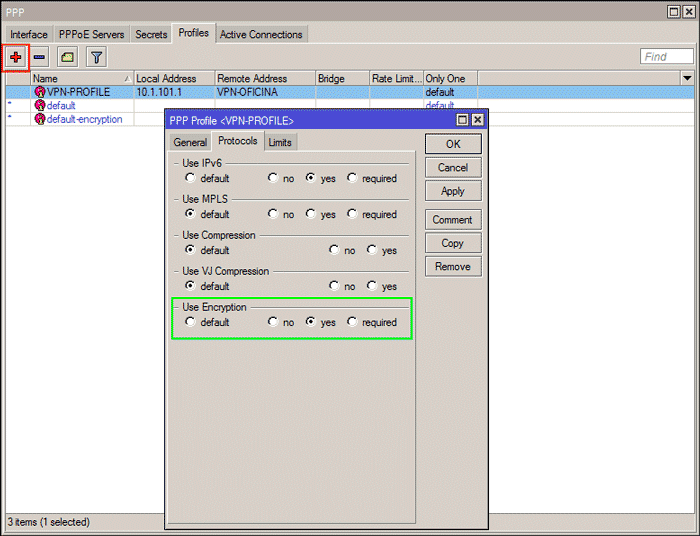 Office VPN protocols profile
If we want to limit connections by time or assign a bandwidth to the connection, we can do so from the Limits tab . This example looks like we limit the connection to 30 minutes. After 30 minutes, the connection will be disconnected and it will be necessary to reconnect the VPN from the client side:
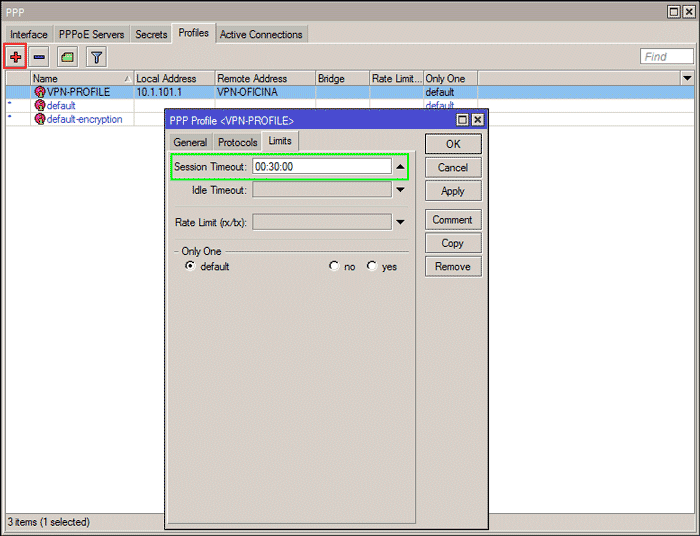 Profile limitations VPN Office
The next step will be to create the user accounts with permissions to establish a VPN connection with our Mikrotik router. From the main menu -> PPP -> Secrets we will create our user by filling in the following fields: Name = user1, Password = password of the user, in Service we will select pptp and in Profile we must select the profile created in previous steps, in this example VPN-PROFILE . We can create as many user accounts as we need:
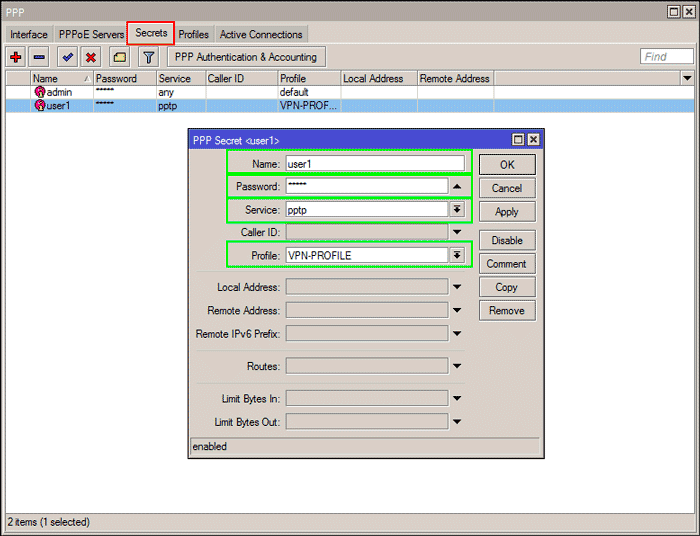 VPN user account
Now we must create the VPN interface, from the main menu -> PPP -> Interface tab we will create a new PPTP VPN type interface and assign a name, for example VPN:
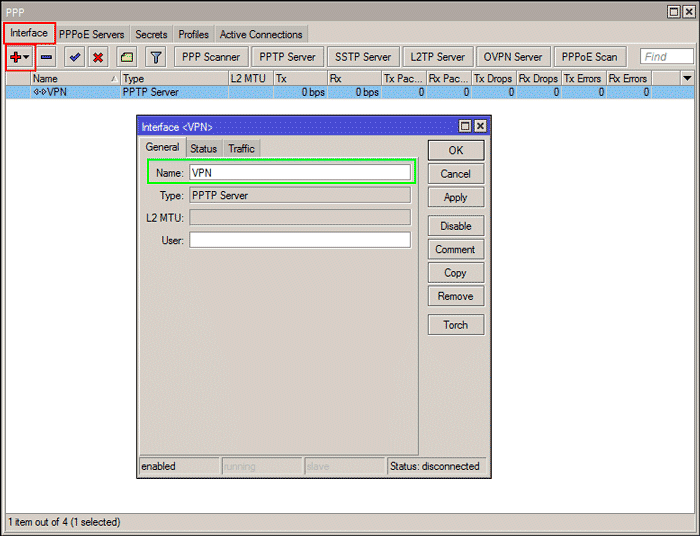 Create VPN interface
The next thing will be to activate the PPTP server , since it is turned off by default. From the Main menu -> PPP -> Interface , clicking on PPTP Server will activate the server, assign the Default Profile to VPN-PROFILE and mark the Authentication as seen in the image:
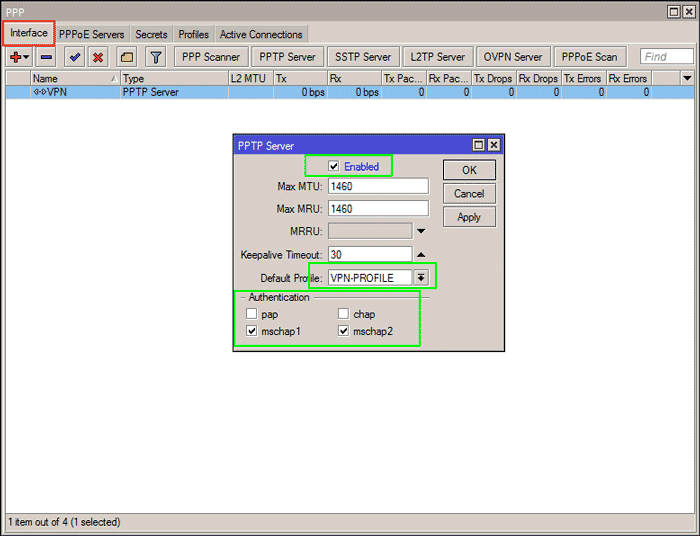 Activate PPTP server
A VERY IMPORTANT point is Activate Proxy-ARP on the LAN network interface . If this configuration is not activated, even if the VPN connection is activated and the tunnel is up, we cannot establish communication between the remote computers of the VPN and the local LAN. Therefore, it is mandatory to activate it:
 ARP proxy LAN interface
4.- CONNECT VPN FROM REMOTE EQUIPMENT
From the client side, we must create a new VPN type connection in which we must enter only the IP address or DNS name of the Mikrotik's public IP and assign it a name. In our example, the public IP is 192.168.80.1. The connection can be created from "Network Connections" in Windows:
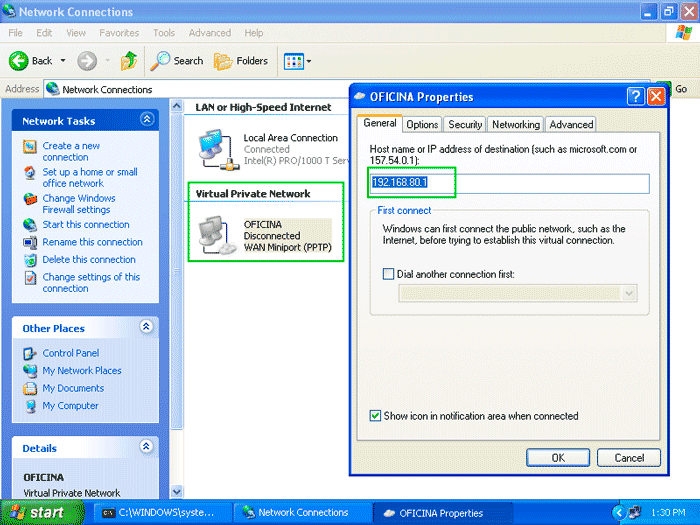 Connect VPN from remote computer
To connect to the VPN, we will double click on the icon of our new connection, in this example it is called OFFICE, and a window will appear to enter the name and user with whom we want to connect to our server. This user must be created in Mikrotik and have pptp permissions :
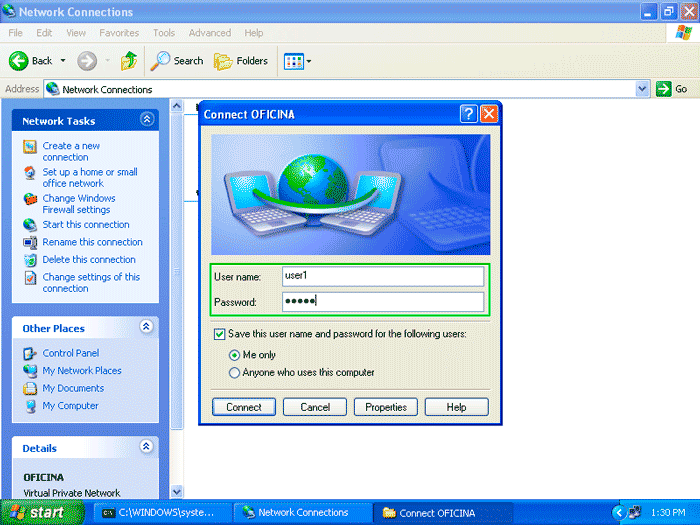 VPN Login
If everything went well , our connection will be established and we can see a new network connection icon in our bottom bar. If we double click we can see the connection status:
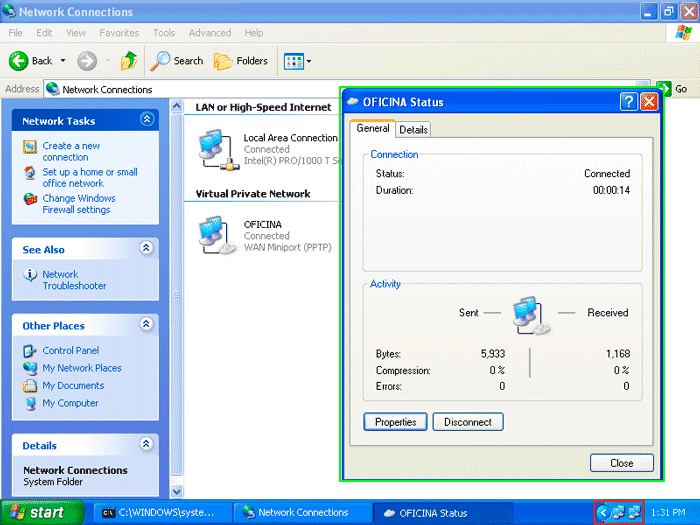 VPN status
When the connection is established correctly, in the Mikrotik we can see all the VPN connections that are established. We can see them from the main menu -> PPP -> Active Connections tab:
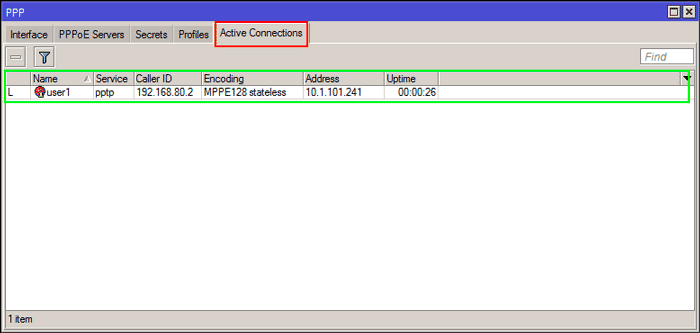 Connections established PPTP VPN
5.- TESTING THE PPTP VPN CONNECTION
Now we will verify that indeed the addressing we have at both ends is correct. To see the IP addresses on the VPN remote computer, we will execute the following command "ifconfig" from the command line . We must have a public IP (in this case 192.168.80.2) and a VPN IP (in this case the one assigned has been 10.1.101.241):
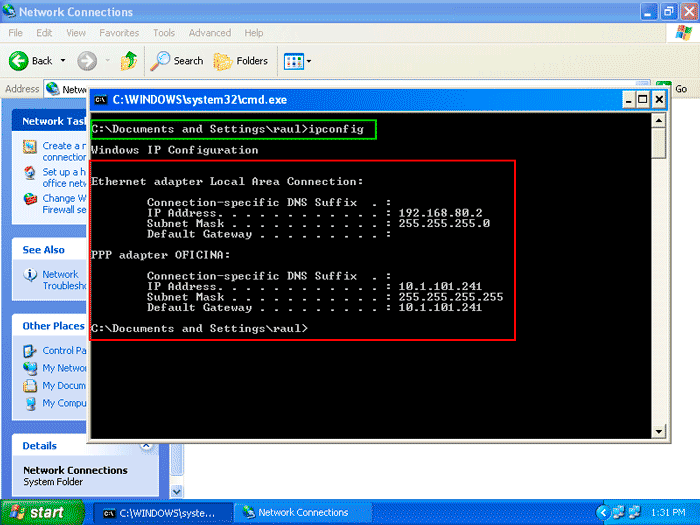 IP addresses remote computer
We execute the same command on the LAN equipment and see that we only have an internal IP 10.1.101.2:
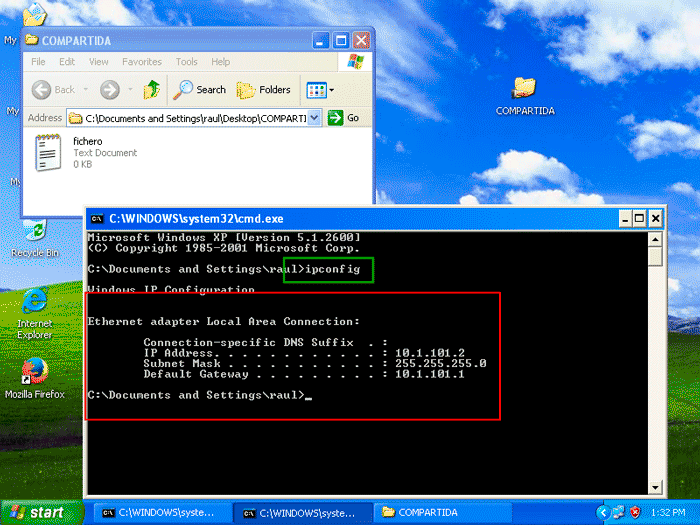 LAN local computer IP address
To test the communication, we will execute a simple PING from the VPN equipment to the LAN equipment. If the ICMP is not filtered, it should work as seen in the following image:
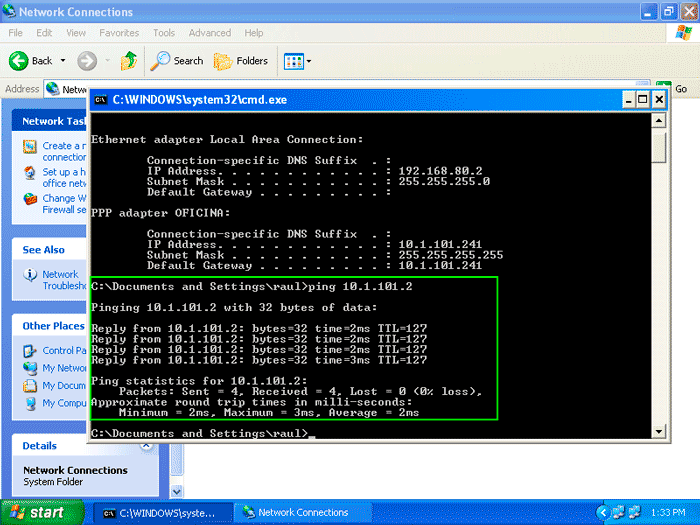 Ping from remote computer to LAN equipment
To test the reverse communication, we will execute a simple PING from the LAN equipment to the VPN equipment. If the ICMP is not filtered, it should work as seen in the following image:
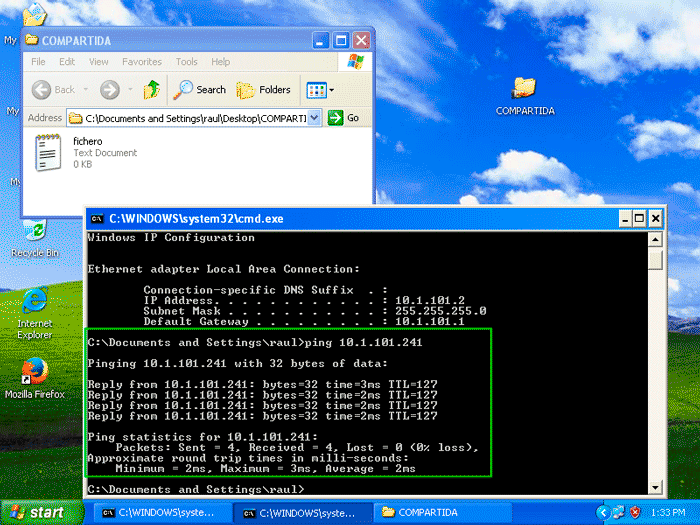 Ping from the LAN to the remote computer
If we share a resource on the LAN equipment, for example a shared folder, we can access it from the remote computer and the VPN from anywhere in the world. On the remote computer we will run \\ 10.1.101.2 to see the shared folders of the LAN equipment:
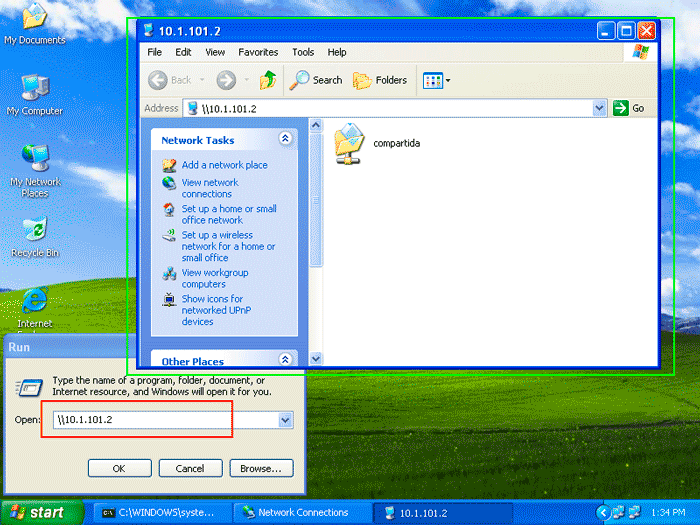 Access to shared folder from remote computer to LAN
If we want to see the characteristics of the VPN tunnel , we will click on the icon of the new connection and on the Details tabwe can see the characteristics of the PPTP VPN connection:
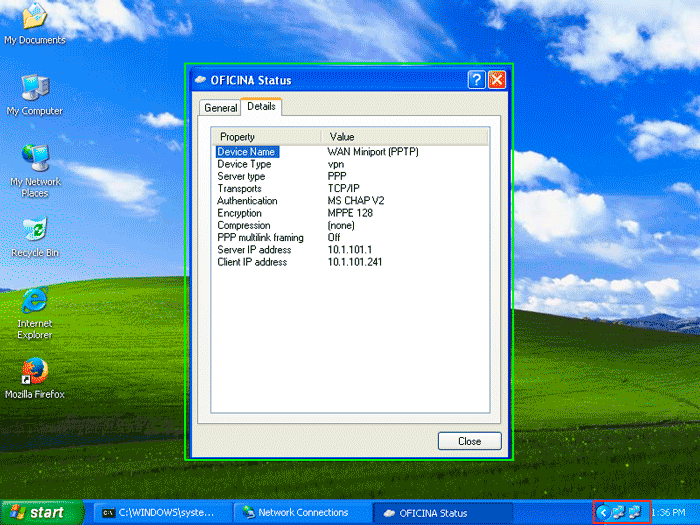 PPTP tunnel characteristics
Thanks For Sharing.Such a Nice Post.
Rufus Crack
MikroTik Crack
Connectify Hotspot Pro crack